
Of course! A Cherry Cheesecake Lush is a quintessential no-bake dessert with layers of crunchy crust, creamy cheesecake filling, fluffy whipped topping, and vibrant cherry pie filling. It’s incredibly easy to make and always a crowd-pleaser.
Here’s a detailed, foolproof recipe.
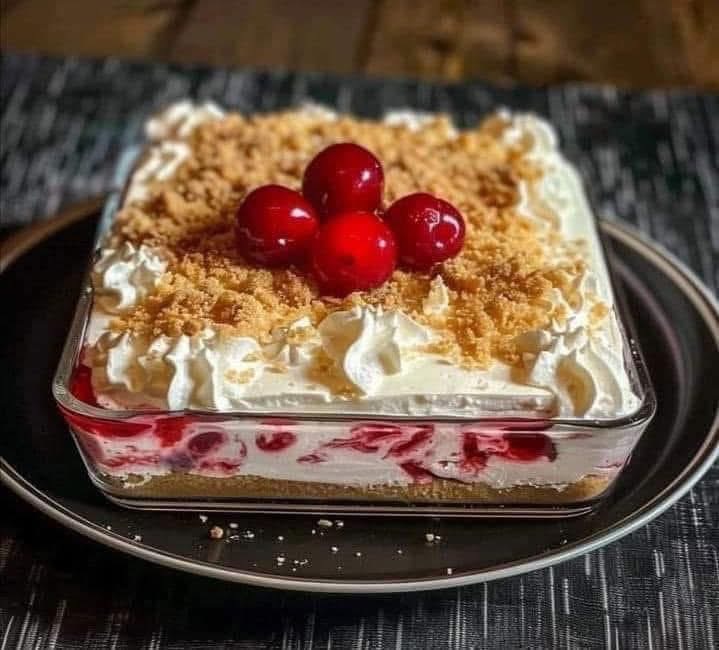
Cherry Cheesecake Lush
This dessert is all about the layers, each providing a different texture and flavor that comes together perfectly.
Yields: 12-16 servings
Prep time: 30 minutes (plus 4+ hours chilling)
Cook time: 10 minutes (for the crust)
Ingredients
For the Crust Layer:
· 2 cups graham cracker crumbs (about 15 full sheets)
· 1/2 cup (1 stick / 113g) unsalted butter, melted
· 1/4 cup granulated sugar
For the Cheesecake Layer:
· 16 oz (two 8 oz blocks) full-fat cream cheese, softened to room temperature
· 1 cup (120g) powdered sugar
· 1 teaspoon vanilla extract
· 1 cup (240ml) heavy whipping cream, cold
For the Topping Layers:
· 1 (21 oz) can cherry pie filling
· 1 (8 oz) container frozen whipped topping (like Cool Whip), thawed – OR – an additional 1.5 cups of homemade whipped cream
Instructions
- Make the Crust:
· Preheat your oven to 350°F (175°C).
· In a medium bowl, mix the graham cracker crumbs, melted butter, and sugar until combined and the texture resembles wet sand.
· Press the mixture firmly and evenly into the bottom of a 9×13-inch baking dish.
· Bake for 8-10 minutes. Remove from the oven and let it cool completely. - Make the Cheesecake Layer:
· In a large bowl, using a hand mixer or stand mixer, beat the softened cream cheese until it’s completely smooth and lump-free.
· Add the powdered sugar and vanilla extract, and beat until well combined and smooth. Scrape down the sides of the bowl as needed.
· In a separate, clean, cold bowl, beat the 1 cup of cold heavy whipping cream until stiff peaks form.
· Gently fold the whipped cream into the cream cheese mixture until no white streaks remain. Be careful not to deflate the mixture. - Assemble the Layers:
· Layer 2 (Cheesecake): Spread the creamy cheesecake mixture evenly over the cooled crust.
· Layer 3 (Whipped Topping): Gently spread the thawed whipped topping (or your second batch of homemade whipped cream) over the cheesecake layer.
· Layer 4 (Cherry): Carefully spoon the cherry pie filling over the whipped topping layer, spreading it into an even layer. - Chill:
· Cover the dish with plastic wrap and refrigerate for at least 4 hours, or overnight for best results. This is crucial for the dessert to set and the flavors to meld. - Serve:
· Cut into squares and serve cold. Store any leftovers covered in the refrigerator for up to 3 days.
Recipe Notes & Tips for Success
· Room Temperature Cream Cheese: This is the #1 secret to a smooth, lump-free cheesecake layer. Take the cream cheese out of the fridge at least an hour before you start.
· Homemade Whipped Cream vs. Cool Whip:
· For the Cheesecake Layer: Using freshly whipped heavy cream (as written) gives a lighter, less sweet texture.
· For the Topping Layer: You can use either. Cool Whip holds its shape longer, making it great for make-ahead desserts. For homemade, whip 1 cup of cold heavy cream with 2 tbsp of powdered sugar and 1/2 tsp of vanilla until stiff peaks form.
· Customize the Flavor:
· Add Zest: Add a tablespoon of lemon zest to the cheesecake layer for a bright, citrusy note.
· Almond Extract: Add 1/4 teaspoon of almond extract to the cheesecake layer to complement the cherries beautifully.
· Different Crusts: Feel free to use crushed vanilla wafers, shortbread cookies, or even Oreos (without the filling) for a different flavor profile.
· Different Toppings: Not a cherry fan? This recipe works wonderfully with blueberry pie filling, strawberry pie filling, or even lemon curd.
· Make it in a Square Pan: For a thicker, more layered presentation, you can make this in a 8×8 or 9×9-inch pan. You may want to reduce the crust ingredients by about one-third.
This dessert is as beautiful as it is delicious, with its striking red and white layers. It’s the perfect easy dessert for potlucks, holidays, or any time a creamy, fruity treat is called for! Enjoy