
Of course! No-Knead Bread is a revolutionary method that delivers a professional-quality, artisan-style loaf with an incredible, crispy crust and an open, chewy crumb, all with almost no hands-on effort. The secret is a very wet dough and a long, slow fermentation.
This is the famous Jim Lahey method, and it will change your bread-baking life.
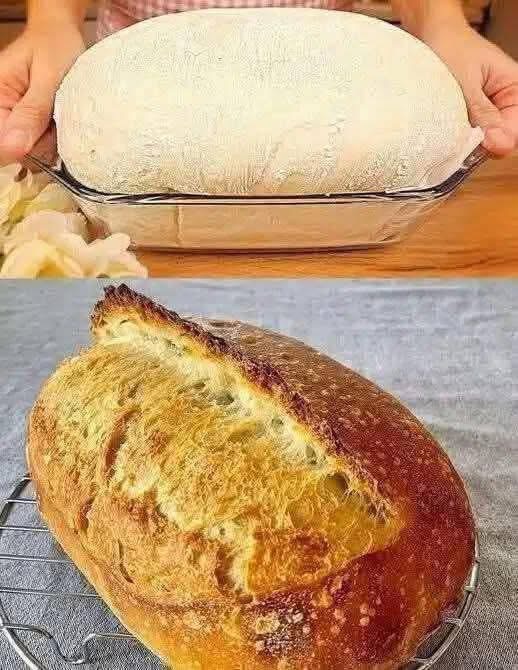
Simple No-Knead Bread
Makes one 1½-pound loaf
Ingredients
· 3 cups (360g) all-purpose flour or bread flour (bread flour gives a chewier crumb)
· 1 ½ teaspoons (7g) kosher salt or sea salt
· ½ teaspoon (2g) instant yeast or active dry yeast
· 1 ½ cups (350g) cool water (about 60-70°F / 15-21°C)
Instructions
Step 1: Mix the Dough (5 minutes)
- In a large bowl, whisk together the flour, salt, and yeast.
- Pour in the cool water.
- Use a wooden spoon or your hands to mix until you have a shaggy, sticky dough ball and no dry flour remains. The dough will be wet and messy—this is perfect!
Step 2: The Long Rise (12-18 hours)
- Cover the bowl tightly with plastic wrap or a lid.
- Let it rest in a warm, draft-free spot on your counter for 12 to 18 hours. The dough is ready when its surface is dotted with bubbles and it has more than doubled in size.
Step 3: Shape & Second Rise (2 hours)
- Generously flour a work surface and your hands. The dough will be very sticky and loose.
- Gently scrape the dough out onto the floured surface. With floured hands, gently fold the dough over itself a few times—north, south, east, west—to form a rough ball.
- Place a clean kitchen towel (not terry cloth) or a piece of parchment paper on a plate or cutting board and dust it very generously with flour or cornmeal.
- Place the dough ball, seam-side down, on the towel. Dust the top of the dough lightly with flour.
- Cover loosely with another towel or the edges of the first towel.
- Let it rise for 1 to 2 hours, until it has almost doubled and doesn’t readily spring back when you poke it gently with a floured finger.
Step 4: Preheat the Pot (30 minutes before baking)
- About 30 minutes before the second rise is finished, place a Dutch oven (with its lid) into your oven. Preheat the oven to 450°F (230°C). The pot must be screaming hot.
Step 5: Bake!
- Carefully remove the hot Dutch oven from the oven. Take off the lid.
- Gently turn your proofed dough over into the hot pot, so the seam-side is now up. It doesn’t have to be neat; it’s going to be beautiful regardless. Be very careful not to touch the hot pot!
- Put the lid back on and place the pot in the oven.
- Bake covered for 30 minutes.
- Remove the lid and bake uncovered for another 15-20 minutes, until the loaf is deeply golden brown and sounds hollow when tapped.
- Carefully remove the bread from the pot and place it directly on a wire rack to cool completely before slicing (at least 1-2 hours). This is hard, but it allows the steam to finish cooking the interior and sets the crumb.
Why This Method Works So Well
· The Wet Dough & Time: The high hydration and long fermentation develop the gluten without kneading and create incredible flavor.
· The Dutch Oven: The preheated pot creates a steamy environment, which is the secret to a crispy, professional-looking crust.
Tips for the Perfect Loaf
· Weigh Your Ingredients: For the most consistent results, use a kitchen scale. The “cup” measurements can vary.
· Don’t Use Hot Water: Cool water slows down the yeast, which is essential for the long, flavor-developing fermentation.
· The Pot is Key: A Dutch oven is ideal, but any heavy, oven-safe pot with a tight-fitting lid will work (like a cast-iron combo cooker or a heavy stockpot).
· Troubleshooting a Pale Crust: If your crust isn’t as dark as you’d like, leave it in the oven for 5-10 more minutes after the lid is off.
· Add-Ins: After the initial mix, you can fold in olives, fresh herbs, roasted garlic, or seeds during the shaping step.
Enjoy the magic of creating a beautiful, bakery-worthy loaf in your own kitchen with minimal effort