
Of course! Mini Chicken Pot Pies are the ultimate individual comfort food. They’re adorable, perfectly portioned, and everyone gets their own golden-brown, flaky crust.
This recipe is straightforward and uses a hack—pre-made pie crust or puff pastry—to make it easy enough for a weeknight but impressive enough for company.
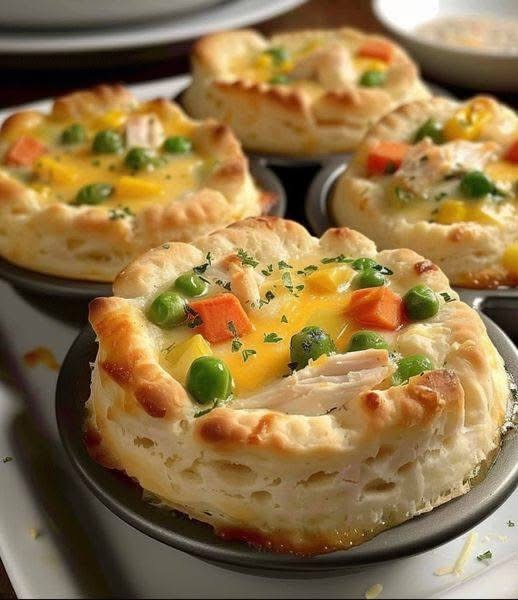
MINI CHICKEN POT PIES
These little pies are filled with a creamy, savory chicken and vegetable filling, all wrapped in a buttery, flaky crust.
Yields: 6-8 mini pot pies
Prep time: 25 minutes
Cook time: 20-25 minutes
Ingredients
For the Filling:
· 2 tablespoons unsalted butter
· 1/2 cup finely diced yellow onion
· 1/2 cup finely diced celery
· 1/2 cup finely diced carrot
· 1 teaspoon minced garlic
· 1/3 cup all-purpose flour
· 2 cups chicken broth
· 1/3 cup whole milk or heavy cream
· 3 cups cooked and shredded chicken (rotisserie chicken is perfect!)
· 1 cup frozen peas (no need to thaw)
· 1 teaspoon dried thyme
· 1/2 teaspoon poultry seasoning (optional)
· Salt and freshly ground black pepper to taste
· 1 tablespoon fresh parsley, chopped (optional)
For the Assembly:
· 1 package (14.1 oz) refrigerated pie crusts (2 crusts), or 1 sheet of puff pastry
· 1 egg, beaten with 1 tablespoon water (for egg wash)
Instructions
Step 1: Prepare
- Preheat your oven to 375°F (190°C). Take the pie crusts out of the fridge to soften according to package directions.
- Lightly grease a standard 6-cup muffin tin.
Step 2: Make the Filling
- In a large skillet or Dutch oven, melt the butter over medium heat. Add the onion, celery, and carrot and cook for 5-7 minutes, until softened.
- Add the garlic and cook for another minute until fragrant.
- Sprinkle the flour over the vegetables and stir constantly for 1 minute to cook out the raw flour taste.
- Gradually whisk in the chicken broth and milk/cream, scraping up any browned bits from the bottom of the pan. Bring to a simmer, stirring constantly, until the sauce thickens.
- Remove from heat. Stir in the shredded chicken, frozen peas, thyme, poultry seasoning, salt, and pepper. Taste and adjust seasoning. Stir in fresh parsley if using.
Step 3: Assemble the Mini Pies
- Create the Bottom Crusts: Unroll the pie crusts on a lightly floured surface. Using a round cutter or a bowl, cut out circles that are about 1-1.5 inches larger in diameter than your muffin tin cups. (A 4.5 to 5-inch circle is usually perfect for a standard muffin tin).
- Line the Tin: Gently press each circle down into a muffin cup, making sure it’s snug against the bottom and sides.
- Fill ‘Em Up: Spoon the chicken pot pie filling into each crust-lined cup, filling them to the top.
- Create the Top Crusts: Cut out slightly smaller circles (about 3.5-4 inches) from the remaining pie dough for the tops. You can also cut fun shapes with a knife or use a small cookie cutter for a vent.
- Seal and Vent: Place a top crust circle over each filled cup. Use a fork to press and crimp the edges of the top and bottom crusts together to seal. Use a sharp knife to cut 2-3 small slits in the top of each pie to allow steam to escape.
- Egg Wash: Brush the top of each mini pie lightly with the egg wash. This will give them a beautiful golden, shiny finish.
Step 4: Bake
- Bake for 20-25 minutes, or until the crust is golden brown and the filling is bubbly.
- Let the pies cool in the muffin tin for 10-15 minutes before carefully removing them. This allows the filling to set, making them much easier to handle.
Key Secrets for Success
· Don’t Skip the Veggie Sauté: Cooking the onions, celery, and carrots first is essential for developing flavor and ensuring they are tender.
· Thickening the Filling: Cooking the flour with the butter and veggies (making a roux) is what creates a rich, creamy gravy that isn’t gloppy.
· Use a Rotisserie Chicken: This is the biggest time-saver and adds great flavor. You’ll need about half of a standard rotisserie chicken.
· Let Them Rest: The 10-minute cooling period is crucial. The filling will be molten lava right out of the oven.
· Get Creative with Tops: You can do a full top crust, a lattice top, or even just use small shapes (like leaves or circles) to partially cover the filling.
Variations & Tips
· Puff Pastry Version: Use thawed puff pastry for the tops only! It creates an incredibly flaky, buttery, and impressive top crust. (The bottom crust is better with a sturdier pie crust).
· Biscuit Topping: Skip the top pie crust and instead place a halved, canned buttermilk biscuit on top of each filled cup before baking.
· Other Veggies: Feel free to add 1/4 cup of frozen corn or green beans along with the peas.
· Make Ahead: You can prepare the filling up to 2 days in advance and store it in the fridge. Assemble and bake when ready.
Serve these mini comfort food masterpieces with a simple green salad. Enjoy