
Of course! White Chocolate Raspberry Cheesecake is an elegant and decadent dessert that combines the rich, creamy flavor of white chocolate with the bright, tangy taste of raspberries. It’s a showstopper.
Here is a detailed, classic recipe that includes a raspberry swirl and a optional raspberry sauce for serving.
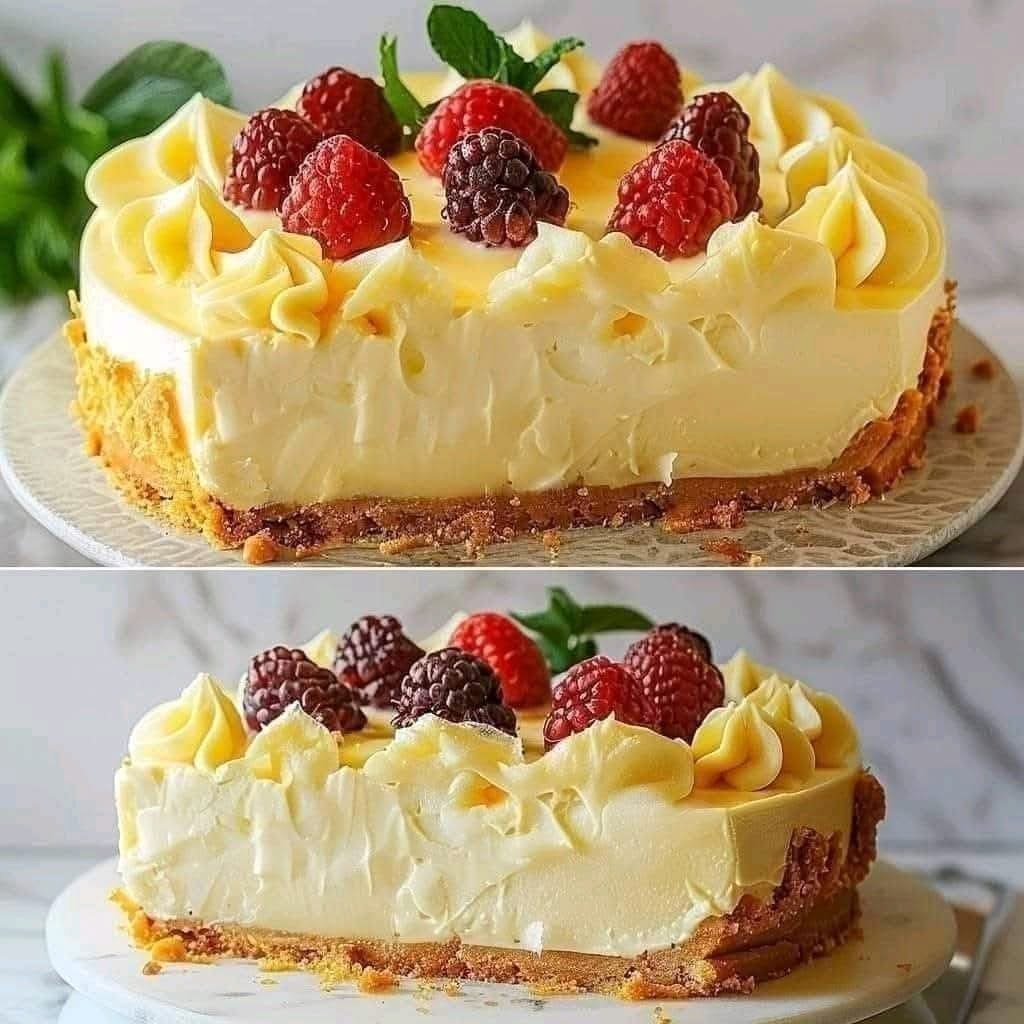
White Chocolate Raspberry Cheesecake
This recipe uses a water bath to ensure a perfectly smooth, creamy texture without cracks.
Prep Time: 45 minutes
Cook Time: 1 hour 15 minutes + cooling time
Chill Time: At least 6 hours, preferably overnight
Servings: 12-14
Ingredients
For the Crust:
· 1 ½ cups (150g) graham cracker crumbs
· ⅓ cup (65g) granulated sugar
· 6 tablespoons (85g) unsalted butter, melted
· Pinch of salt
For the Raspberry Swirl:
· 6 ounces (about 1 ½ cups) fresh or frozen raspberries (thawed if frozen)
· 2 tablespoons granulated sugar
· 1 teaspoon lemon juice
For the Cheesecake Filling:
· 4 packages (32 oz / 904g total) full-fat cream cheese, softened to room temperature
· 1 cup (200g) granulated sugar
· 1 cup (8 oz / 240g) sour cream, at room temperature
· 6 ounces (170g) high-quality white chocolate, melted and slightly cooled
· 4 large eggs, at room temperature
· 2 teaspoons pure vanilla extract
· ¼ teaspoon salt
For the Optional Raspberry Sauce:
· 12 ounces (about 3 cups) fresh or frozen raspberries
· ⅓ cup (65g) granulated sugar
· 1 tablespoon lemon juice
· 1 tablespoon cornstarch mixed with 1 tablespoon water (for thickening)
Instructions
Part 1: The Raspberry Swirl
- In a small saucepan, combine the raspberries, sugar, and lemon juice. Cook over medium heat, stirring frequently, until the raspberries break down and the mixture becomes saucy (about 5-7 minutes).
- Press the mixture through a fine-mesh sieve to remove the seeds. Discard the seeds and let the puree cool completely. You should have about ½ cup of puree.
Part 2: The Crust
- Preheat Oven: Preheat your oven to 350°F (175°C). Wrap the outside bottom and sides of a 9-inch springform pan with a double layer of heavy-duty aluminum foil to prevent water from the bath seeping in.
- Mix Ingredients: In a medium bowl, stir the graham cracker crumbs, sugar, and salt together. Add the melted butter and mix until the crumbs are evenly moistened and resemble wet sand.
- Press into Pan: Press the mixture firmly into the bottom and about halfway up the sides of the prepared springform pan. Use the bottom of a flat glass or measuring cup to pack it down tightly.
- Pre-bake: Bake the crust for 8-10 minutes. Remove from the oven and let it cool slightly. Reduce the oven temperature to 325°F (160°C).
Part 3: The Cheesecake Filling & Water Bath
- Melt Chocolate: Melt the white chocolate in a double boiler or in the microwave in 20-second bursts, stirring until smooth. Set aside to cool slightly.
- Beat Cream Cheese: In the bowl of a stand mixer fitted with a paddle attachment (or using a hand mixer), beat the softened cream cheese and sugar on medium-low speed until perfectly smooth and creamy, about 2-3 minutes. Scrape down the bowl frequently. Do not over-whip, as this incorporates too much air.
- Add Wet Ingredients: Beat in the sour cream, melted white chocolate, vanilla extract, and salt until just combined.
- Add Eggs: Add the eggs one at a time, beating on low speed just until the yolk disappears after each addition. Over-mixing the eggs is a primary cause of cracking. Scrape the bowl once more to ensure everything is incorporated.
- Assemble: Pour about two-thirds of the cheesecake filling into the cooled crust. Dollop about half of the cooled raspberry puree over the top. Pour the remaining filling over the dollops. Now, dollop the remaining raspberry puree on top.
- Create Swirl: Use a toothpick or a thin knife to gently swirl the raspberry puree into the cheesecake batter. Don’t over-swirl, or the colors will muddy.
- Prepare Water Bath: Place the springform pan inside a large roasting pan. Carefully pour hot water into the roasting pan until it comes about halfway up the sides of the springform pan.
- Bake: Bake at 325°F (160°C) for 60-75 minutes. The edges of the cheesecake will be set, but the center will still have a slight jiggle (like Jell-O) when you gently shake the pan. This is perfect.
- Cool: Turn off the oven, crack the oven door open about 1 inch, and let the cheesecake cool slowly in the oven for 1 hour. This gradual temperature change helps prevent cracking.
- Chill: Remove the cheesecake from the water bath, carefully remove the foil, and place it on a wire rack to cool to room temperature. Then, cover it loosely with plastic wrap and refrigerate for at least 6 hours, but preferably overnight.
Part 4: The Raspberry Sauce (Optional)
- Combine raspberries, sugar, and lemon juice in a saucepan. Cook over medium heat until bubbling and the berries break down.
- Press the mixture through a sieve to remove seeds.
- Return the seedless sauce to the pan. Whisk in the cornstarch slurry and bring to a simmer for 1-2 minutes until thickened. Let cool completely.
To Serve
- Run a thin knife around the edge of the cheesecake before releasing the springform pan collar.
- Slice with a sharp knife dipped in hot water and wiped dry between each cut for clean slices.
- Serve each slice with a drizzle of the raspberry sauce and fresh raspberries.
Tips for Success
· Room Temperature is Key: All refrigerated ingredients (cream cheese, eggs, sour cream) MUST be at room temperature to ensure a smooth, lump-free batter.
· Don’t Over-mix: Once you add the eggs, mix on low speed and only until combined. Over-mixing incorporates air and can cause the cheesecake to puff up and crack as it cools.
· The Water Bath is Non-Negotiable: This is the secret to a professional, creamy texture. It provides gentle, even heat.
· High-Quality White Chocolate: Use real white chocolate (which contains cocoa butter), not white baking chips, for the best flavor.
· Patience is a Virtue: Do not rush the cooling process. Chilling overnight is crucial for the flavor to develop and the texture to set perfectly.
Enjoy your masterpiece! It’s truly a special dessert.