
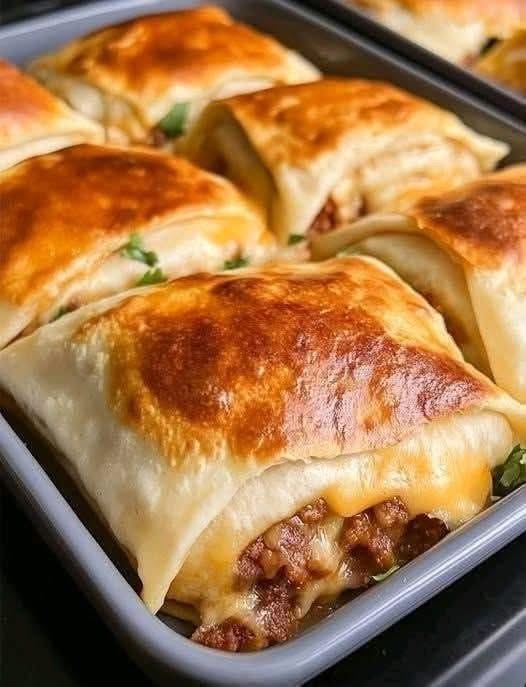
Of course! “Loaded Cheesy Pocket Tacos” are a fun, innovative, and incredibly satisfying twist on traditional tacos. They feature a crispy, cheesy shell that forms a perfect pocket to hold all your favorite fillings without any mess.
This recipe is highly customizable and guaranteed to be a hit.
What are Loaded Cheesy Pocket Tacos?
Imagine a cross between a quesadilla, a tostada, and a taco. You create a “shell” made of baked or pan-fried cheese that is malleable enough to fold into a pocket while warm. Once it cools and hardens slightly, it becomes a crispy, edible container that you can load up with any taco fillings you love.
Recipe: Loaded Cheesy Pocket Tacos
This recipe makes 4-6 cheese pockets.
Part 1: The Cheesy Pocket Shells
Ingredients:
· 2 cups (8 oz) shredded cheese (a blend works best for flavor and melt)
· Recommended blend: Part Monterey Jack (for meltability), part Cheddar (for flavor), and a bit of Queso Quesadilla or Asadero if you can find it.
· Optional Add-ins for the Shell:
· 1 tbsp finely chopped cilantro
· 1/2 tsp cumin or chili powder
· A pinch of garlic powder
Instructions:
- Prep: Preheat your oven to 375°F (190°C). Line a large baking sheet with parchment paper or a silicone baking mat.
- Form the Shells: For each pocket, create a circle of shredded cheese on the prepared baking sheet. Each circle should be about 5-6 inches in diameter. Make them as even as possible, but a little raggedness is fine. Sprinkle with any optional add-ins.
- Bake: Bake for 5-8 minutes, or until the cheese is fully melted, bubbly, and the edges are just starting to turn golden brown.
- Shape:
· Oven Method: Immediately upon removing from the oven, let them cool for just 30-60 seconds until they are cool enough to handle but still very pliable.
· Stovetop Alternative: You can also make these in a non-stick skillet over medium heat. Sprinkle the cheese into a circle, cook until bubbly and lacy at the edges, then flip gently and cook for another 15-20 seconds. Remove to shape. - Create the Pocket: Drape the warm, pliable cheese circle over a narrow object to create a taco shell shape. The handles of wooden spoons or spatulas resting on two cups work perfectly. You can also gently drape them over a taco stand or the edge of a baking dish. Let them cool and harden completely in that shape (about 5-10 minutes).
Part 2: The Fillings (Choose Your Favorites!)
This is where you get creative. Prepare these while the cheese shells are cooling.
Protein Options:
· Classic Ground Beef: 1 lb ground beef cooked with 1-2 tbsp taco seasoning.
· Shredded Chicken: 2 cups shredded rotisserie or boiled chicken mixed with taco seasoning and a splash of broth.
· Carne Asada: Grilled, thinly sliced steak.
· Beans: Seasoned black beans or refried beans for a vegetarian option.
Topping Bar:
· Shredded Lettuce (romaine or iceberg for crunch)
· Diced Tomatoes
· Diced Red Onion or Pickled Onions
· Sliced Jalapeños (fresh or pickled)
· Guacamole or sliced avocado
· Sour Cream or Mexican Crema
· Fresh Cilantro
· Salsa (pico de gallo for freshness, or a smooth salsa verde)
· A squeeze of Lime Juice
Part 3: Assembly & Serving
- Once your cheese pockets have cooled and are firm, carefully remove them from their molding station.
- Layer Smartly: To prevent the crispy shell from getting soggy too quickly, start with a layer of your protein or beans. Next, add a layer of lettuce, which acts as a barrier. Then, pile on the rest of your cold toppings (tomatoes, onions, salsa, crema, etc.).
- Serve Immediately: Enjoy your loaded cheesy pocket tacos right away! The combination of the warm, crispy, cheesy shell with the cool, fresh toppings is incredible.
Pro Tips & Variations:
· Cheese is Key: Pre-shredded cheese contains anti-caking agents that can prevent it from melting as smoothly. For the best results, shred your own cheese from a block.
· Keep Them Warm: If you need to make several shells at once, keep them pliable by placing the shaped shells in a warm oven (lowest setting) until you’re ready to fill them.
· Spice it Up: Add a pinch of cayenne pepper or some finely chopped chipotle in adobo to the cheese before baking for a spicy kick.
· Different Shapes: Instead of a taco shape, you can drape the warm cheese over an upside-down bowl to create a “cheese bowl” for a taco salad!
· Dietary Note: For a keto or low-carb meal, this is a perfect solution as the shell is pure cheese.
Enjoy your delicious, crunchy, cheesy, and totally customizable culinary creation